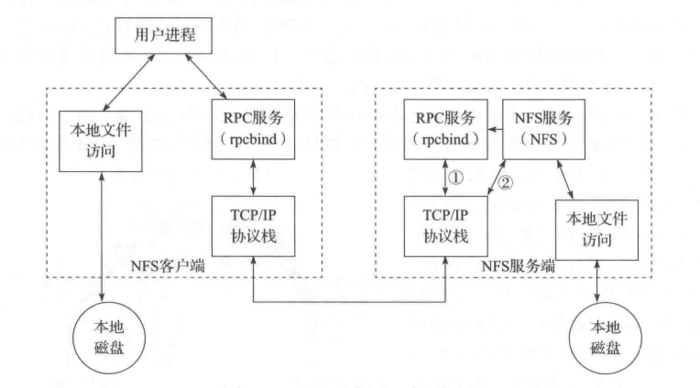
NFS在kubernetes中做为共享存储,用的还是比较多的,之前也就是一直用着,也没有太关注是如何实现Dynamic provisioning,今天花了点时间研究了一下原理,还是挺有意思.
NFS Servers 1 2 3 4 5 6 7 8 9 10 11 12 13 apt install yum -y install nfs-utils rpcbind mkdir -p /data/nfsecho "/data/nfs/fluentd-conf *(rw,sync,no_subtree_check,no_root_squash)" >> /etc/exportexportfs -r systemctl enable rpcbind systemctl enable nfs-server systemctl start rpcbind systemctl start nfs-server
NFS Client client端只需要二步即可使用server端share出来的目录
1 2 3 4 5 mkdir /media/nfs_dirmount 192.168.8.150:/data/nfs /media/nfs_dir
当然,在kubernetes中主要还是使用Dynamic NFS provisioning为主, 不会直接像上面这样使用nfs
这里还是将3种方式都贴一下.
使用volume nfs做为volume还是有好几种使用方式的:
做为普通volume 1 2 3 4 5 6 7 8 9 10 11 12 13 14 15 16 17 18 19 20 21 22 23 24 25 26 27 28 29 30 31 32 33 34 35 36 37 38 apiVersion: apps/v1 kind: Deployment metadata: name: redis spec: selector: matchLabels: app: redis revisionHistoryLimit: 2 template: metadata: labels: app: redis spec: containers: - image: redis name: redis imagePullPolicy: IfNotPresent ports: - containerPort: 6379 name: redis6379 env: - name: ALLOW_EMPTY_PASSWORD value: "yes" - name: REDIS_PASSWORD value: "redis" volumeMounts: - name: redis-persistent-storage mountPath: /data volumes: - name: redis-persistent-storage nfs: path: /data/nfs/redis/data server: 192.168 .8 .150
作为persistentVolume 1 2 3 4 5 6 7 8 9 10 11 12 13 14 15 16 17 18 19 20 21 apiVersion: v1 kind: PersistentVolume metadata: name: nfs-pv spec: capacity: storage: 5Gi volumeMode: Filesystem accessModes: - ReadWriteOnce persistentVolumeReclaimPolicy: Recycle storageClassName: slow mountOptions: - hard - nfsvers=4.1 nfs: path: /data/nfs/data server: 192.168 .5 .150
上面两种方式在kubernetes用nfs做为持久卷时用的还是比较少,因为需要事先在nfs中创建好相关的目录,存在一些手工操作. 重点在下.
作为Dynamic NFS provisioning helm部署参考nfs-client-provisioner
这里选择重要的资源对象来阐述nfs是如何实现dynamic provision功能的
首先来看一下storageclass,这个也没什么好说的.
1 2 3 4 5 6 7 apiVersion: storage.k8s.io/v1 kind: StorageClass metadata: name: nfs-storageclass provisioner: nfs-test parameters: archiveOnDelete: "false"
还会部署一个deployment资源
1 2 3 4 5 6 7 8 9 10 11 12 13 14 15 16 17 18 19 20 21 22 23 24 25 26 27 28 29 30 31 32 kind: Deployment apiVersion: extensions/v1beta1 metadata: name: nfs-pod-provisioner spec: replicas: 1 strategy: type: Recreate template: metadata: labels: app: nfs-pod-provisioner spec: serviceAccountName: nfs-pod-provisioner-sa containers: - name: nfs-pod-provisioner image: quay.io/external_storage/nfs-client-provisioner:latest volumeMounts: - name: nfs-provisioner-v mountPath: /persistentvolumes env: - name: PROVISIONER_NAME value: nfs-test - name: NFS_SERVER value: 192.168 .1 .5 - name: NFS_PATH value: /nfs/data volumes: - name: nfs-provisioner-v nfs: server: 192.168 .1 .5 path: /nfs/data
这个deployment其实是做为一个nfs client起作用,它把整个nfs server的共享目录/nfs/data都挂载到了/persistentvolumes下, 这为后面根据pvc自动生成创建pv目录有关.
生成一个pvc
1 2 3 4 5 6 7 8 9 10 11 apiVersion: v1 kind: PersistentVolumeClaim metadata: name: nfs-pvc-test spec: storageClassName: nfs-storageclass accessModes: - ReadWriteMany resources: requests: storage: 50Mi
当使用一个pod指定使用使用上面的pvc后,上面的deployment会根据pvc自动生成一个pv, pvc与该pv进行绑定, 且在nfs servers上创建相应的目录,pod将该目录挂载进了自己容器目录中,这样就实现了Dynamic provisioning功能了
1 2 3 4 $ kubectl apply -f nfs_pvc_dynamic.yaml nfs-pvc-test Bound pvc-620ff5b1-b2df-11e9-a66a-080027db98ca 50Mi RWX nfs-storageclass 7s $ ls /nfs/data/ default-nfs-pvc-test-pvc-620ff5b1-b2df-11e9-a66a-080027db98ca
nfs-pvc-test为pvc, pvc-620ff5b1-b2df-11e9-a66a-080027db98ca为pv, default-nfs-pvc-test-pvc-620ff5b1-b2df-11e9-a66a-080027db98ca即为在nfs-server共享目录下创建的目录,这个目录最后被为使用该pvc的pod挂载.
这个deployment的源码可参考nfs-client-provisioner , deployment核心代码如下:
1 2 3 4 5 6 7 8 9 10 11 12 13 14 15 16 17 18 19 20 21 22 23 24 25 26 27 28 29 30 31 32 33 34 35 36 37 38 39 40 41 42 43 44 45 46 47 48 func (p *nfsProvisioner) error ) { if options.PVC.Spec.Selector != nil { return nil , fmt.Errorf("claim Selector is not supported" ) } glog.V(4 ).Infof("nfs provisioner: VolumeOptions %v" , options) pvcNamespace := options.PVC.Namespace pvcName := options.PVC.Name pvName := strings.Join([]string {pvcNamespace, pvcName, options.PVName}, "-" ) fullPath := filepath.Join(mountPath, pvName) glog.V(4 ).Infof("creating path %s" , fullPath) if err := os.MkdirAll(fullPath, 0777 ); err != nil { return nil , errors.New("unable to create directory to provision new pv: " + err.Error()) } os.Chmod(fullPath, 0777 ) path := filepath.Join(p.path, pvName) size, err := getNfsCapacity() if err != nil { return nil , errors.New("unable to get nfs size to provision new pv: " + err.Error()) } fmt.Println("=====" , size.Value()) pv := &v1.PersistentVolume{ ObjectMeta: metav1.ObjectMeta{ Name: options.PVName, }, Spec: v1.PersistentVolumeSpec{ PersistentVolumeReclaimPolicy: options.PersistentVolumeReclaimPolicy, AccessModes: options.PVC.Spec.AccessModes, MountOptions: options.MountOptions, Capacity: v1.ResourceList{ v1.ResourceName(v1.ResourceStorage): *size, }, PersistentVolumeSource: v1.PersistentVolumeSource{ NFS: &v1.NFSVolumeSource{ Server: p.server, Path: path, ReadOnly: false , }, }, }, } return pv, nil }
因此整个流程为:
pod生成使用一个pvc, 当pvc发布到集群中时, nfs-client-provisioner deployment就会根据该pvc的yaml文件获取namespace, pvc-name等信息在挂载的nfs共享目录下创建新的目录, 然后生成一个pv与该pvc绑定,pod使用该pv就相当于使用nfs server共享目录一样
那nfs server的共享目录是如何做到的呢?
NFS 原理 NFS 使用RPC(Remote Procedure Call)的机制进行实现,RPC使得客户端可以调用服务端的函数。同时,由于有 VFS 的存在,客户端可以像使用其它普通文件系统一样使用 NFS 文件系统。经由操作系统的内核,将 NFS 文件系统的调用请求通过 TCP/IP 发送至服务端的 NFS 服务。NFS服务器执行相关的操作,并将操作结果返回给客户端
我觉得上面那段话说的很明白, nfs实现共享存储还是通过网络将本地操作写入到nfs server端,只不过这个网络操作由RPC来完成, 同时也需要内核的支持.
nfs更加详细的原理,感兴趣的可以参考NFS原理详解
参考文章:
