Kubernetes学习(Sealed Secrets如何安全地将密码存储在git中)
在Devops中经常面对的一个问题就是,如何将敏感信息保存在git中, 虽然kubernetes提供了secret,但它也只是Base64转换了一下, 任何人拿到这个串都可以反转出来,不安全.
在GitOps的流程上, 如何解决save everything on git but secrets的问题一直是个非常有趣的话题,而今天要说的Sealed Secrets就是一个很好的工具, 可以与Kubernetes无缝接入.
原理
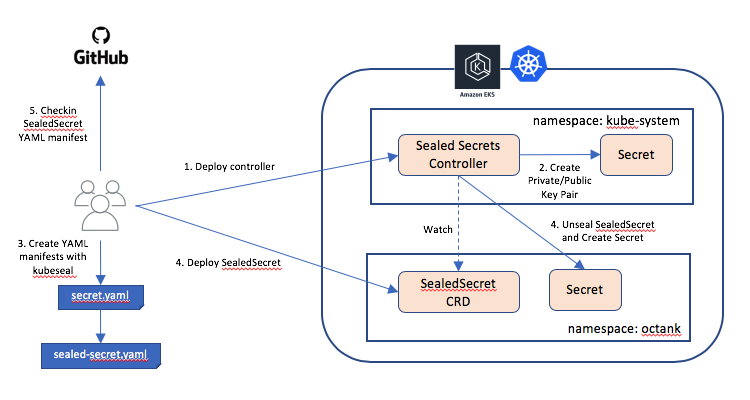
Sealed Secrets 包括以下组成部分:
- 一个部署到集群的控制器
- 一个名为 kubeseal 的 CLI 工具
- 一个名为 SealedSecret 的定制化资源定义 (CRD)
启动后,控制器会查找集群范围的私钥/公钥对,如果未找到,则会生成一个新的 4096 位 RSA 密钥对。私钥保存在一个 Secret 对象中,该对象位于控制器所在的命名空间中。任何想要在此集群中使用 Sealed Secrets 的人都可以公开获得此密钥的公钥部分。
加密时,原始 Secret 中的每个值都使用带有随机生成的会话密钥的 AES-256 方式进行对称加密。然后,将 SHA256 和原始 Secret 的命名空间/名称作为输入参数,使用控制器的公钥对会话密钥进行非对称加密。加密过程的输出结果是一个字符串,其构造为:加密会话密钥的长度(2 个字节)+ 加密会话密钥 + 已加密的 Secret。
将 SealedSecret 自定义资源部署到 Kubernetes 集群时,控制器会watch该类资源,然后使用私钥将其解封并创建一个 Secret 资源。解密时,会再次使用 SealedSecret 的命名空间/名称作为输入参数。这样可以确保 SealedSecret 和 Secret 严格绑定到相同的命名空间和名称。
配套的 CLI 工具 kubeseal 用于使用公钥从 Secret 资源定义中创建 SealedSecret 定制化资源定义 (CRD)。kubeseal 可以通过 Kubernetes API 服务器与控制器进行通信,并在运行时检索加密 Secret 所需的公钥。您也可以从控制器下载公钥并保存在本地以便离线使用
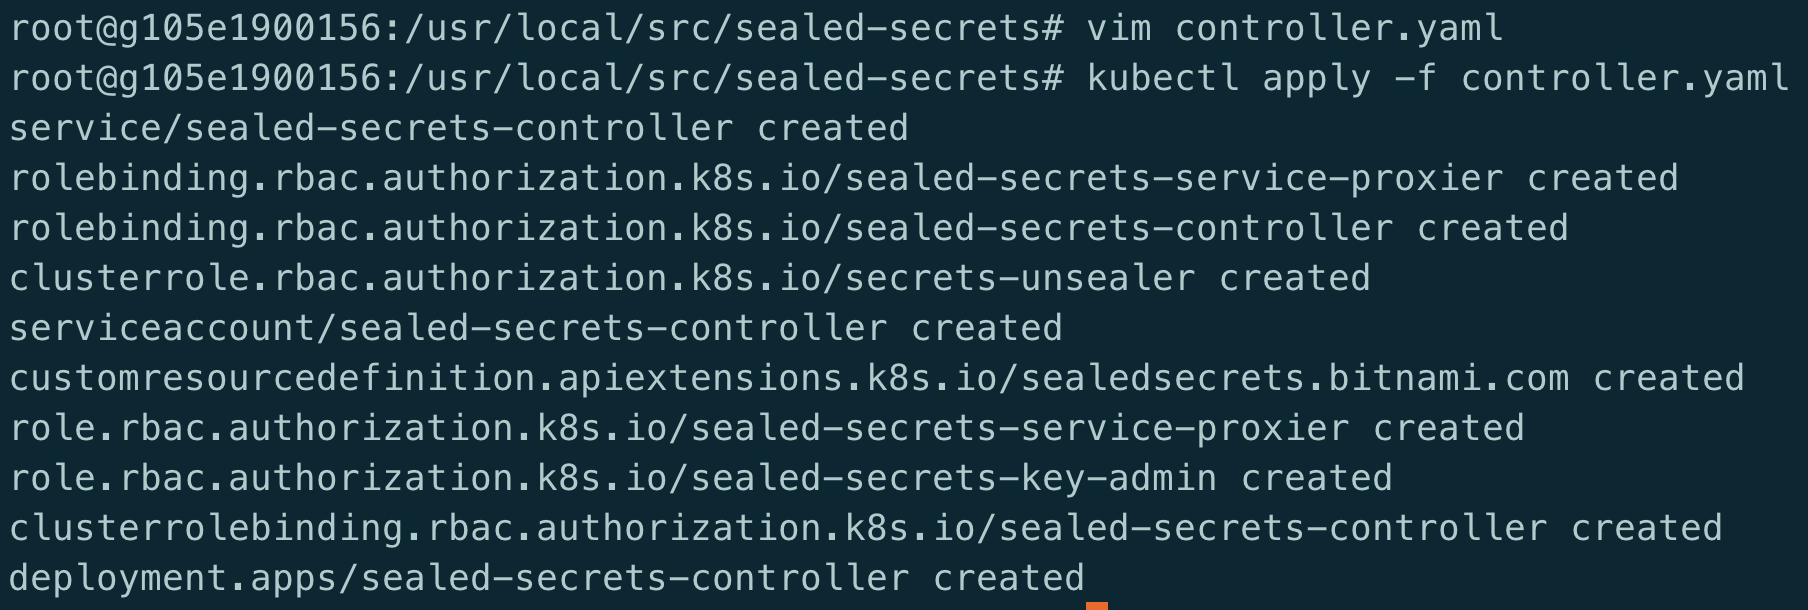
安装controller
1 | kubectl apply -f controller.yaml |
密钥对
通过上面生成的CRD之后, 查看sealed-secrets-controller的日志文件可以发现:
1 | 2020/06/24 16:34:47 Starting sealed-secrets controller version: v0.12.4+dirty |
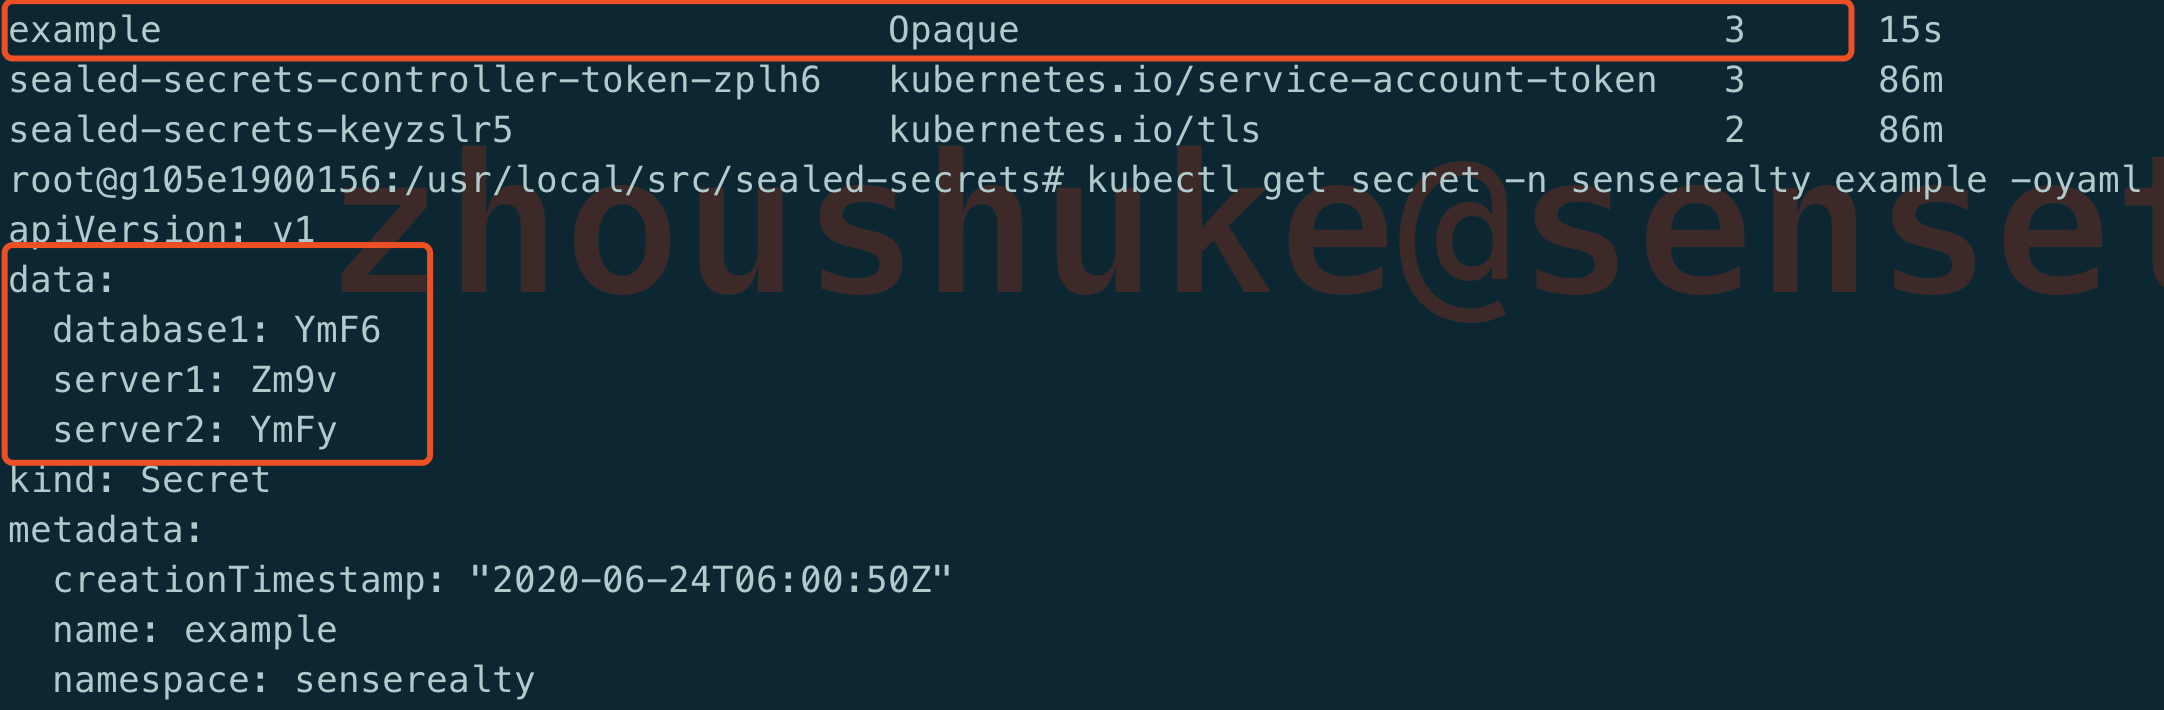
启动时,控制器会在其命名空间中搜索带有 sealedsecrets.bitnami.com/sealed-secrets-key 标签的 Secret。如果找不到,控制器会在其命名空间中创建新的 Secret, 查看sealed-secrets-keyzslr5.
1 | kubectl get secret -n senserealty -l sealedsecrets.bitnami.com/sealed-secrets-key -o yaml |
1 | apiVersion: v1 |
该secret包含证书及私钥,私钥用于解密集群中的SealedSecret资源.
安装kubeseal
1 | wget https://github.com/bitnami-labs/sealed-secrets/releases/download/v0.12.4/kubeseal-linux-amd64 -O kubeseal |
kubeseal 使用公钥加密 Secret,该公钥是它在运行时从在 Kubernetes 集群中运行的控制器获取的,也就是说,kubeaeal会读取~/.kube/config文件来获取集群权限,然后查找集群中的sealed-secrets-controller控制器来获取公钥.
如果无法获取集群权限, 可以通过以下命令直接把公钥下载到本地
1 | kubeseal --fetch-cert >mycert.pem --controller-namespace senserealty |
在加密时,使用–cert来指定本地的pem公钥文件, 这样的话,就可能够保证集群权限最小化.
1 | kubeseal --format=yaml --cert=public-key-cert.pem < secret.yaml > sealed-secret.yaml |
Example
这里直接使用的是github上的example, 参考这里
secret
1 |
|
通过kubeseal生成sealed-secret
1 | kubeseal --format=yaml < secret.yaml > sealed-secret.yaml --controller-namespace senserealty |
会在当前目录下生成sealed-secret.yaml,该文件内容已被加密,将该文件发布到集群中
1 | kubectl apply -f sealed-secret.yaml |
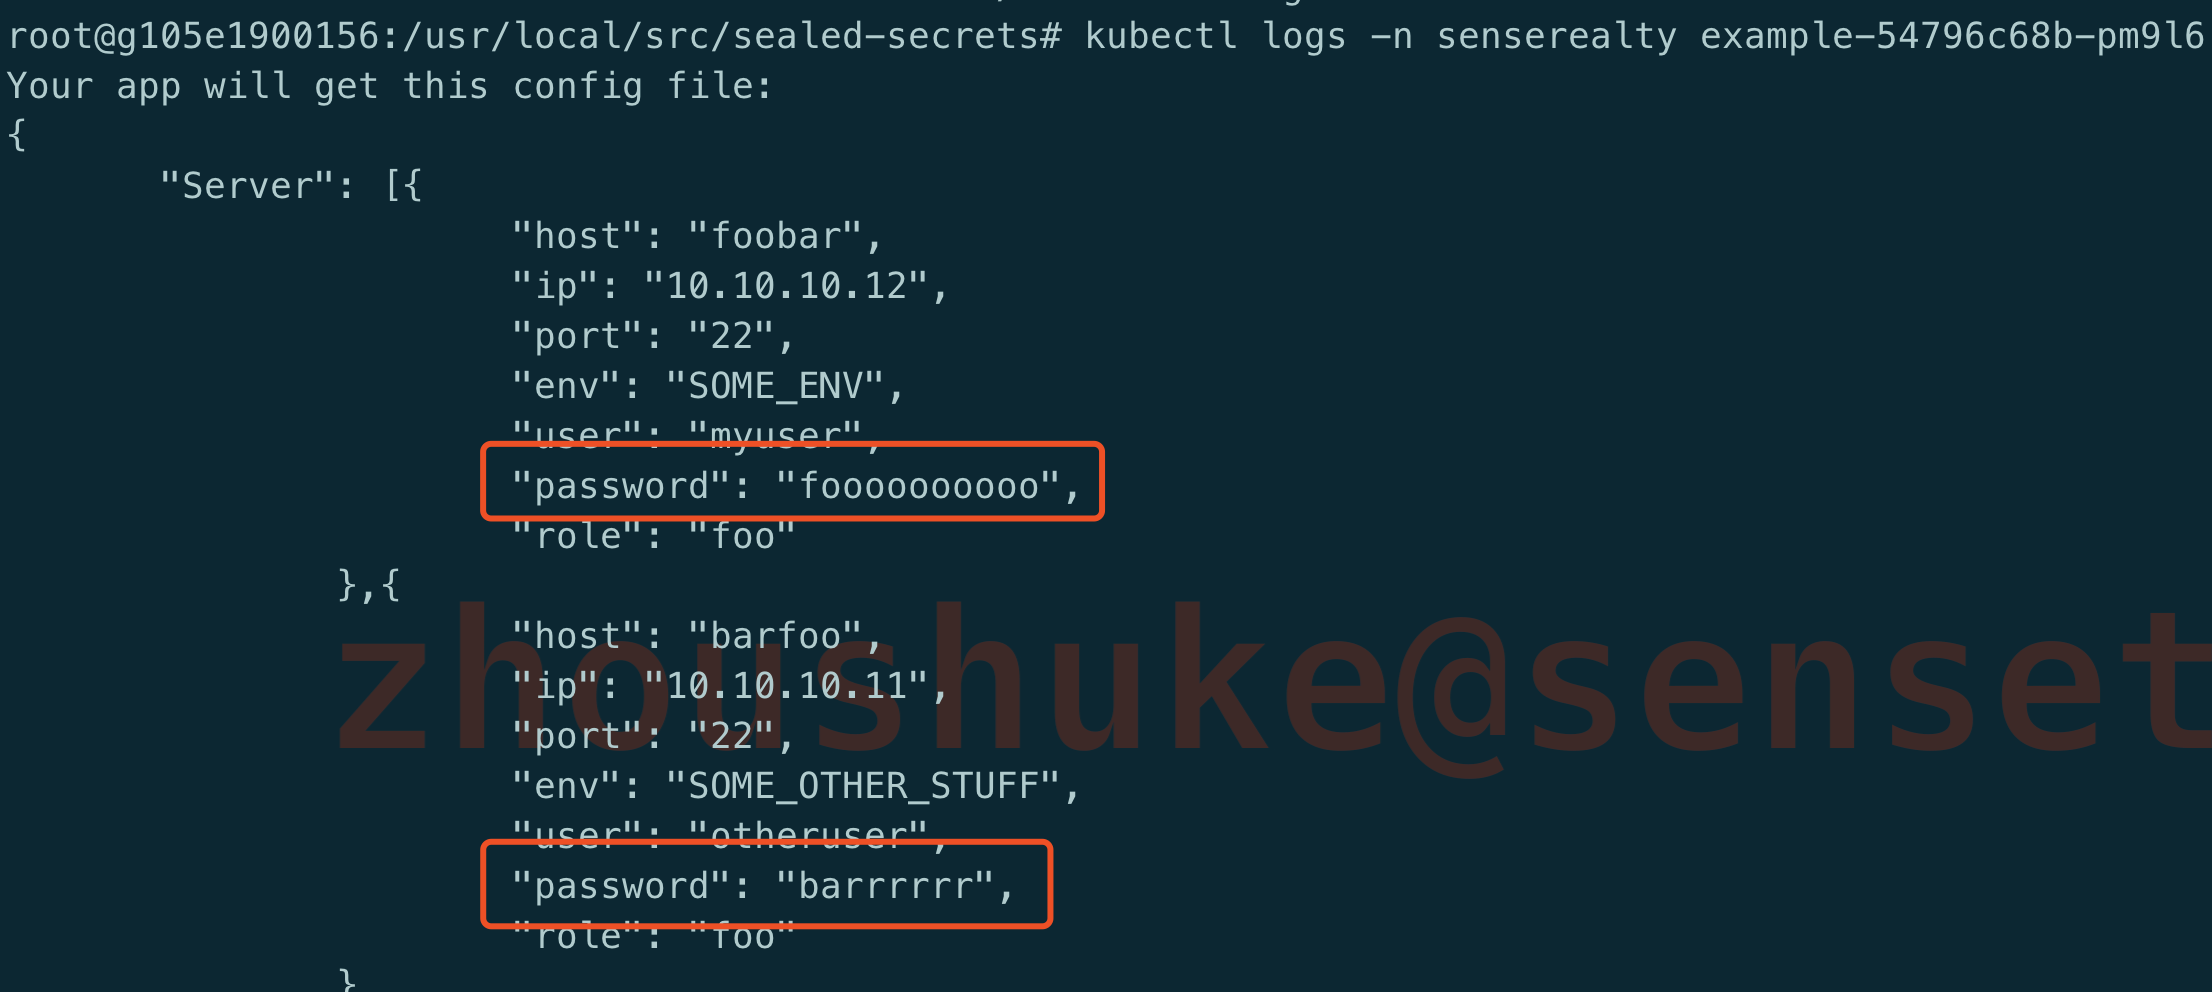
查看集群中的secret, 会发现secret被解密成正常的secret(通过base64加密过后的)
同样, 可以在controller中查看到日志,显示该secret被成功解密.

configmap
官方的example里还包含了一个configmap, 该configmap里引用了上面的secret, 最终我们验证的时候可以看configmap中引用的内容是否正确.
这也是生产上常用的方式, app中的配置使用configmap,但是敏感的信息也不能放在configmap中, 因此configmap中使用了模板的形式引用被kubeseal加密后的secret
1 |
|
发布到集群中
1 | kubectl apply -f configmap.yaml |
deployment
1 |
|
该deployment有一个initcontainer, 用goemplate将secret填充configmap中的变量, 然后containers中的容器直接打印最终的config配置
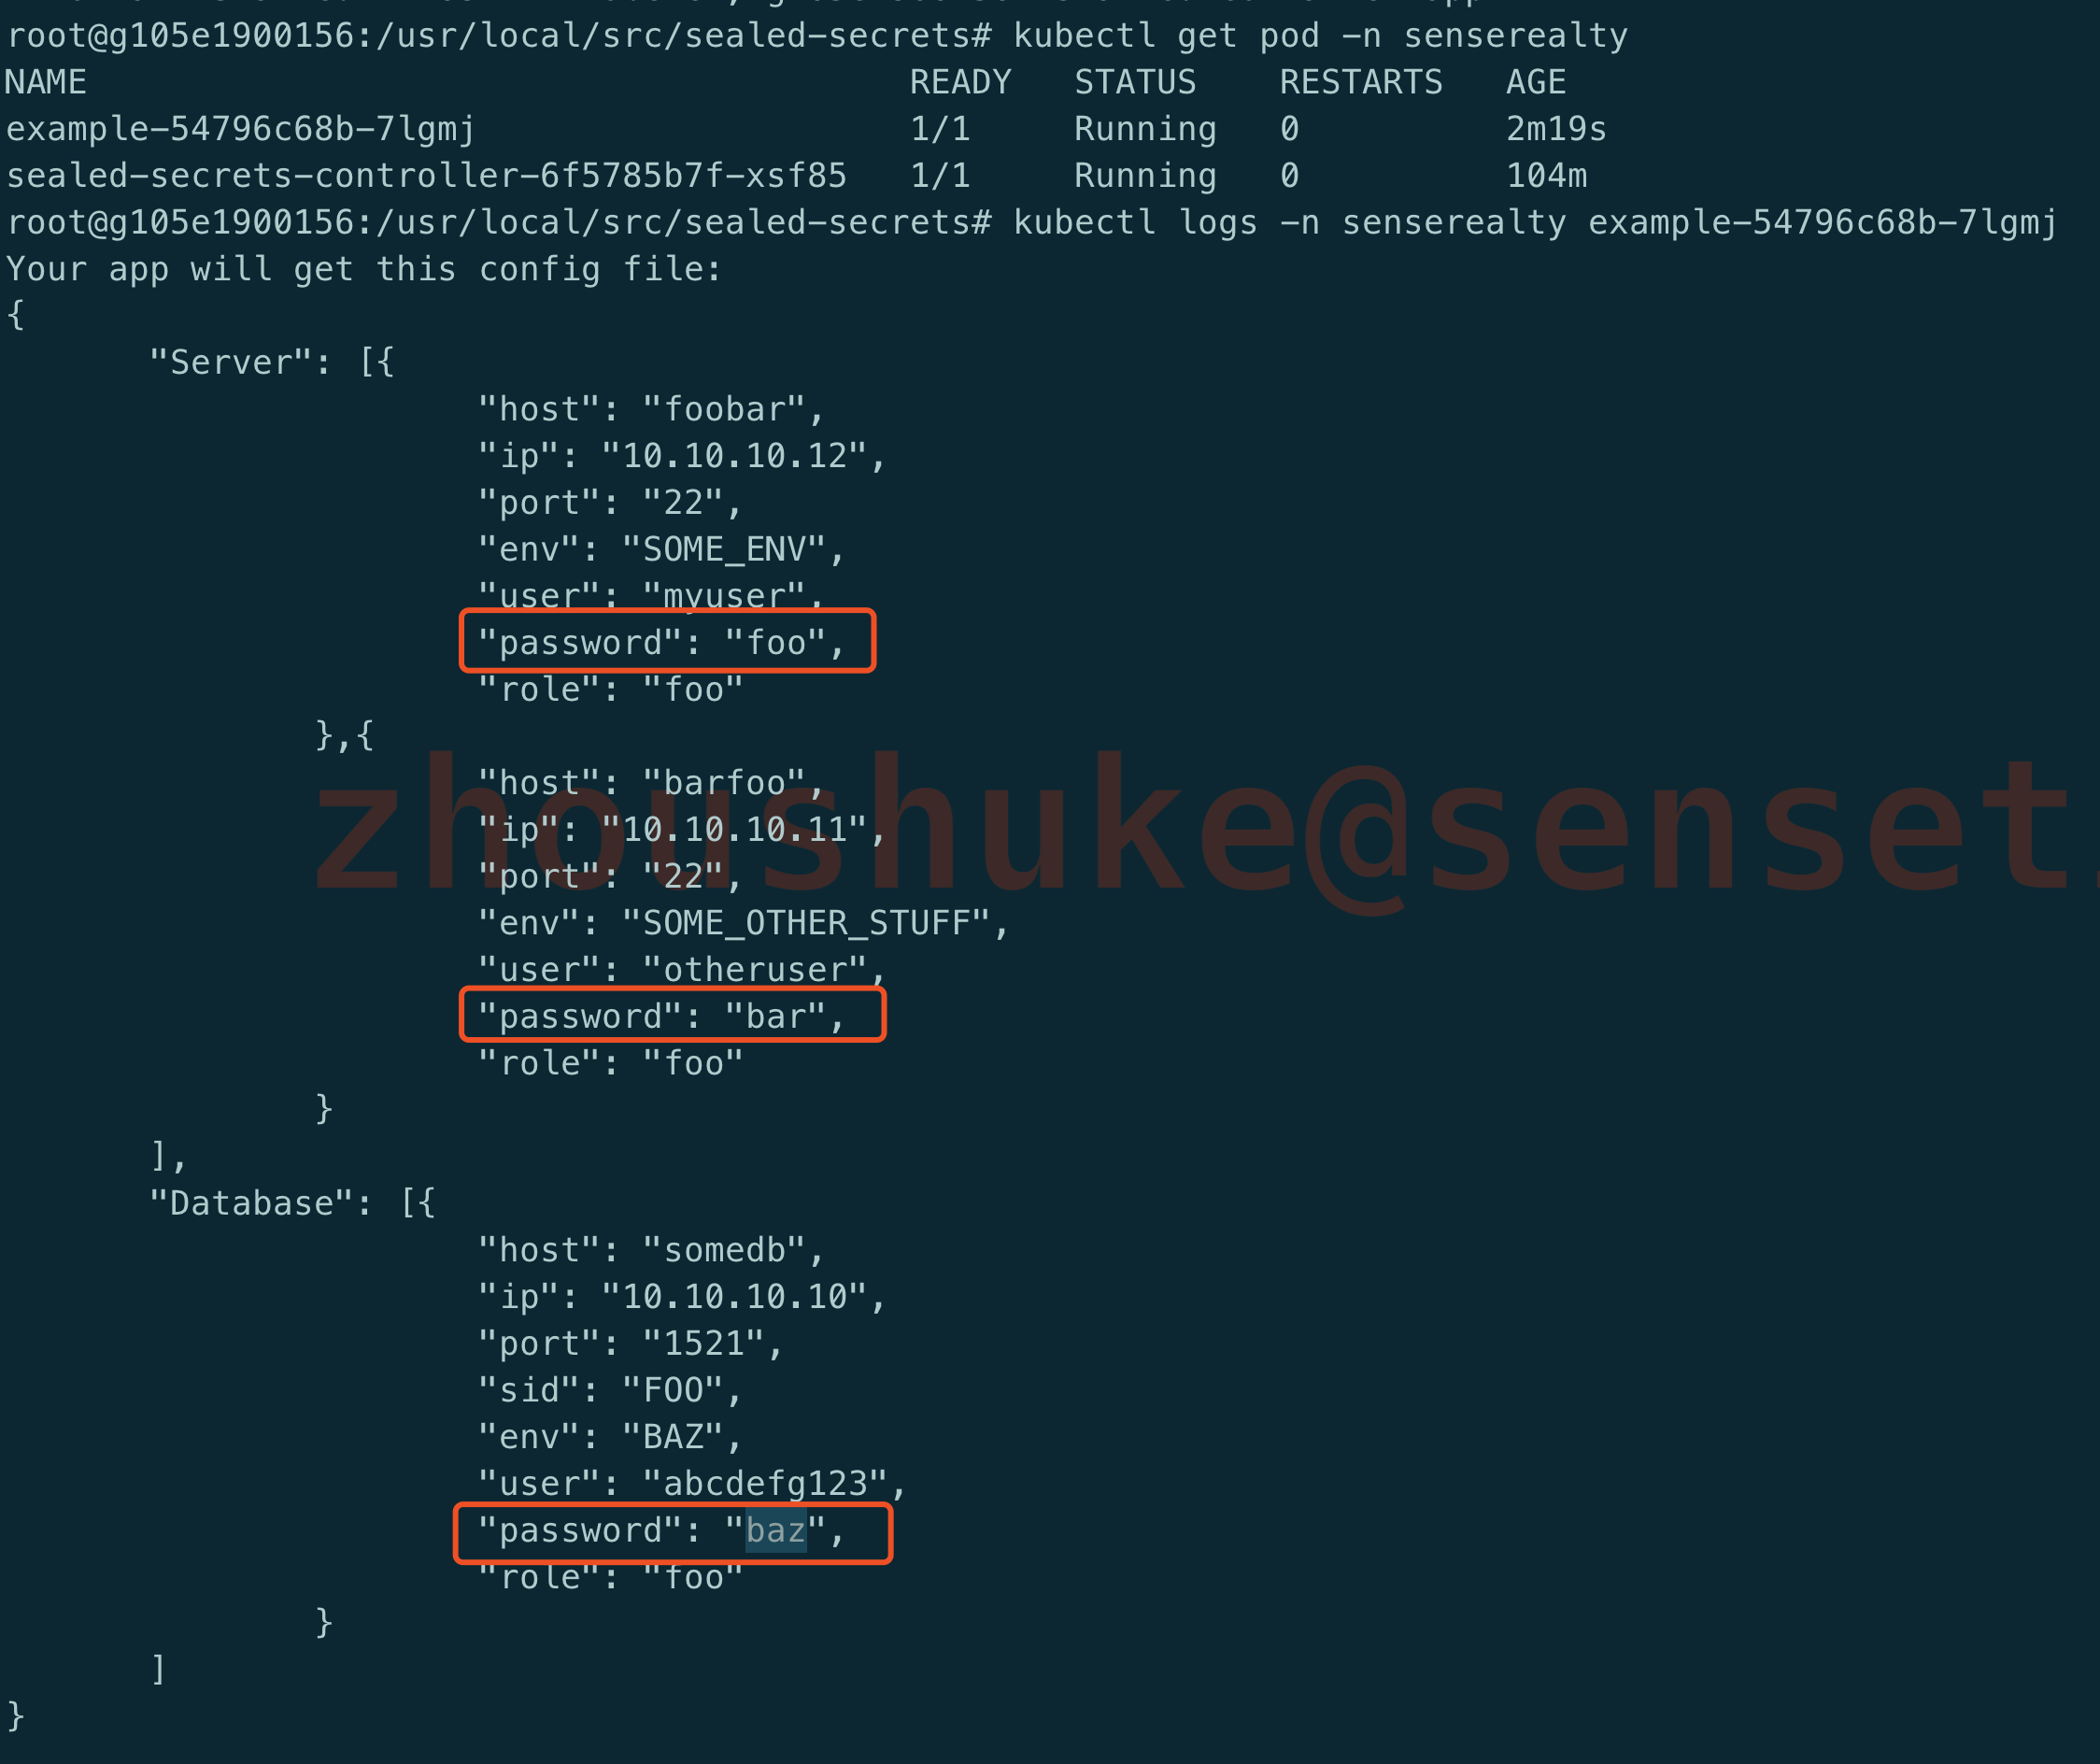
从上面可以看出, configmap中的变量跟原始的secret中的值完全一样. 达到了对secret加解密的作用.
更新secret
SealedSecret支持对存在的secret进行更新.
可使用 --merge-into
1 | # 生成一个secret, 文件名为foo,内容为bar |
当然也可以按照正常的更新secret的方式,先更新secret ,然后使用SealedSecret加密,然后发布到集群中,然后更新app.
最后可以看到,app中的config也更新了.
使用范围
SealedSecret提供了3种对ns的安全限制, 我大概看了下说明, 觉得虽然会更安全, 但是会带来使用上的复杂性, 大部分情况下,secret还是会跟app在同一ns中,因此这块内容本人没有实验, 可参考scope
strict(default): the secret must be sealed with exactly the same name and namespace. These attributes become part of the encrypted data and thus changing name and/or namespace would lead to “decryption error”.namespace-wide: you can freely rename the sealed secret within a given namespace.cluster-wide: the secret can be unsealed in any namespace and can be given any name.
安全
如果没有由控制器管理的私钥,就无法在 SealedSecret 中对已加密的数据进行解密。如果SealedSecret被集群广泛使用, 那么就需要小心集群发生灾难性异常,在恢复之后或者迁移到一个新集群之后,新集群中部署的控制器必须使用相同的私钥才能解封 SealedSecrets。如果没有此私钥,则必须使用新的私钥/公钥对重新生成所有 SealedSecrets,这对于包含大量 Secret 资源的部署可能会是一项繁重的任务。因此备份私钥非常有必要, 可以使用以下命令从控制器中获取证书及私钥写到文件中
1 | kubectl get secret -n senserealty -l sealedsecrets.bitnami.com/sealed-secrets-key -o yaml > master.yaml |
这样,即使整个集群崩溃或者迁移到新集群之后,使用相同的私钥创建的SealedSecret CRD同样可以解密由这个私钥加密的secret.
1 | kubectl apply -f master.yaml |
通过这种方式, 敏感信息可以只被少数人掌握, 开发同学则直接引用加密后的信息即可
当然,上面的例子只是一个demo, SealedSecret提供了一种思路,生产中SealedSecret如何更好地对接kubernetes app, 还需要进一步地研究.
就跟SealedSecret官方说的那样:
Problem: “I can manage all my K8s config in git, except Secrets.”
Solution: Encrypt your Secret into a SealedSecret, which is safe to store - even to a public repository. The SealedSecret can be decrypted only by the controller running in the target cluster and nobody else (not even the original author) is able to obtain the original Secret from the SealedSecret
SealedSecret在GitOps的流程上又推进了一步.